An Illustrated History of Old Sutton in St Helens, Lancashire
Part 92 (of 95 parts) - Bold Power Station (1955 to 1986)
Researched & Written by Stephen Wainwright ©MMXX Contact Me
Researched & Written by Stephen Wainwright ©MMXX
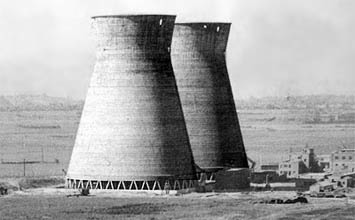
Technically the correct name should be Bold Power Stations, as there were two. The 'A' station comprised four 30 megawatt (MW) generating units, of which one had been the first water-cooled generator in the world. Two large cooling towers provided the 'A' station with its all-important turbine condenser cooling. The 'B' station was more powerful than 'A', possessing three 60 MW units and their cooling was provided by three towers. 'B' station was also more advanced than 'A', with a greater steam pressure of 900psi (compared to 600psi) and a higher temperature of 482° Celsius (compared to 454°).

The first water-cooled generator in the world was installed at Bold in 1956, a 30 MW unit part of station 'A'
The first water-cooled generator in the world was installed at Bold in 1956
The first water-cooled generator in the world was installed at Bold in 1956

The layout of Bold Power Station situated off Travers Entry in Bold
The layout of Bold Power Station situated off Travers Entry in Bold
The layout of the Bold Power Station

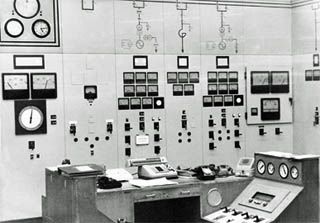
The 'B' station control room at Bold Power Station (left) and in the turbine room (right) - contributed by Neil Selfridge
The 'B' station control room at Bold (left) and in the turbine room (right)

Bold Power Station turbine room

The main electrical control desk for the Bold 'A' station which supplied local sub-stations in St Helens and Widnes
Bold 'A' station’s main electrical control desk which supplied sub-stations
Bold ‘A’s main electrical control desk
The national demand for electricity fluctuates throughout the day with minimum requirements in the small hours and peak demand around 8:30am to 9:30am and from 4:30pm to 6pm. Bold received its daily assessments of likely demand from Grid Control in Manchester after breaking down predictions from the National Control Centre in London.
The control engineer received the morning programme around 2:30am and the shift charge engineer then decided which units needed to be brought on load to satisfy the likely demand. A typical programme for Bold's 'A' station that required all four units might read: '06.30: 22MW; 0700: 44MW; 07.30: 66MW; 08.00: 88MW, standby 120MW'.
Further programmes were received from Manchester at intervals during the day, requiring variations in generation at a target frequency. The large round dial to the left of the 'B' station photo with the pointer just past vertical, indicated the mains frequency with 50Hz at the vertical position. The turbine governor would adjust load slightly to take account of any small changes in demand.

Coal sidings at Bold Power Station although coal was invariably delivered by conveyor from Bold Colliery
Coal sidings, although coal mainly arrived by conveyor from Bold Colliery
Coal sidings at Bold Power Station

A pulverising mill at Bold which crushed the coal to a fine powder enabling instant ignition in a furnace
Pulverising mill which crushed coal to a fine powder enabling instant ignition
Pulverising mill which crushed coal to a fine powder enabling instant ignition
Hot air was blown upwards from the air belt situated below the revolving table and coal particles that fell over the rim of the table were carried upwards towards rotating blades in the top of the mill, known as 'classifiers'. The larger particles would strike the blades and fall back to be re-ground. However the finer coal particles would pass through the classifiers and were then fed to the burners.
There was a different system employed at the 'B' station, where the mills used large steel drums with corrugated cast iron liners to pulverise the coal. Each drum contained 27 tons of two-inch diameter steel balls. Coal entered the rotating drum at one end and was crushed by the action of the tumbling balls. Hot air was fed into the mill and the coal /air mixture was then drawn out and fed to the burners.

One of the 3 boilers (burners) at the 'B' station which were operated from a unit control room - 'A' had 4 boilers
One of the three boilers at the 'B' station, operated from a unit control room
One of the three boilers at 'B' station
Within the 'A' station's boiler house, operators would man the boiler control panels. However 'B' station had a more modern design and the boilers and turbines were operated from a unit control room. The four boilers in 'A' each evaporated 300,000 lbs of water per hour while the three boilers in 'B' station each evaporated 550,000 lbs of water per hour.

The 'A' station turbine hall at Bold Power Station which was manned by dedicated turbine operators
The 'A' station turbine hall manned by dedicated turbine operators
The 'A' station turbine hall at Bold

Surveying the damage within Bold Power Station after a turbine explosion - contributed by Peter Carmichael
Surveying the damage within Bold Power Station after a turbine explosion
The damage after a turbine explosion
Norman Edwards was also working at Bold Power Station the day the turbine blew up and had a lucky escape:

Left: Gareth Owen pictured in the turbine hall in 1966; Right: In a control room at Bold Power Station - contributed by Gareth Owen
Left: Gareth Owen in the turbine hall in 1966; Right: In a control room

Gareth Owen in the turbine hall in 1966

Gareth Owen in the 'B' Station Control Room at Bold Power Station in 1966 - contributed by Gareth Owen
Gareth Owen in the 'B' Station Control Room at Bold Power Station in 1966
Gareth Owen pictured in the 'B' Station Control Room at Bold in 1966

Aerial photo taken c.1990 after Bold Colliery's demolition showing Bold Power Station - contributed by Neil Selfridge
Aerial photo taken about 1990 after the demolition of Bold Colliery
Bold aerial photo taken about 1990
The 56-year-old was demanding face-to-face talks with the power station's bosses and a cut in his rates bill. Mr Whalley also believed that the drifting ash from the power station possessed an acid content, which damaged the concrete products stored in his yard. "I was here before the power station was built", he added. "I objected when it was proposed to build the station so close to my yard. But I was just a voice in the wilderness then."
For nearly thirty years the station had five cooling towers but in February 1985 two were demolished. This was apparently as a result of high winds that had caused a cooling tower at the nearby Fiddlers Ferry power station to collapse. Insurance inspections were subsequently carried out on the five Bold towers and two were discovered to be in a slightly more deteriorated state than the others. They were deemed uninsurable and so were demolished. Although by this time the towers were redundant as the 'A' unit of the power station that fed the twin towers had been decommissioned in October 1981.

A fire sends a pall of smoke over Bold Power Station's three remaining cooling towers - contributed by Jim Lamb
A fire sends a pall of smoke over Bold's three remaining cooling towers
A fire sends a pall of smoke over Bold’s three remaining cooling towers

End of an era as Bold Power Station's remaining cooling towers are destroyed in 1992 - Contributed by Les Standish
Bold Power Station's remaining cooling towers are destroyed in 1992

Cooling towers are destroyed in 1992

The New Bold housing estate of almost 600 homes on the site of Bold Power Station
The New Bold housing estate built on the site of Bold Power Station
The New Bold housing estate built on the site of Bold Power Station